
One-stop application to configure your MIDILLI devices.
This manual will explain the generic Configurator usage. The Configurator will have a different layout with your own device.
Were you just looking for the place to download it? Then check this page:
Don’t have a controller yet, or looking for the Factory Manual? Then check these pages:
Choose a topic from below to read more:
Features
Configurator is the only software you need to get the most out of your own MIDILLI devices. Once you register your device on your account, it will align with your own design. Almost no learning curves because you designed it!
Here is a list of its features:
- Unique interface aligned with your own design(s)
- Set behaviour of each control element
- Change visible name of the components for each bank*
- Real-time view of current functions of the control elements at the current bank
- Change default channel of all components
- Check and update firmware of your controller
- Enable or disable inputs or outputs
- Built-in MIDI Listener to check if the current setup matches your expectations
- Perform simple MIDI automation with buttons
- Change how the MIDI messages are transmitted using MIDI Router
- Filter which messages should be transmitted to which MIDI outputs
- Import or export device settings
*Bank: Depending on the number of control elements on your controller, you can change between different sets of MIDI assignments, allowing each button, knob, or fader to control different functions.
Download and Installation
MIDILLI Configurator requires no installation, simply download the ZIP files for your system and launch it: Get Configurator.
Main Window
The Configurator features a similar interface to the Factory, but with a simpler design. Once the setup is loaded, the right side will display your device, while the left side allows you to make changes to the selected component or send the changes to the current device. Below is an example setup—yours will be aligned to your specific device layout.
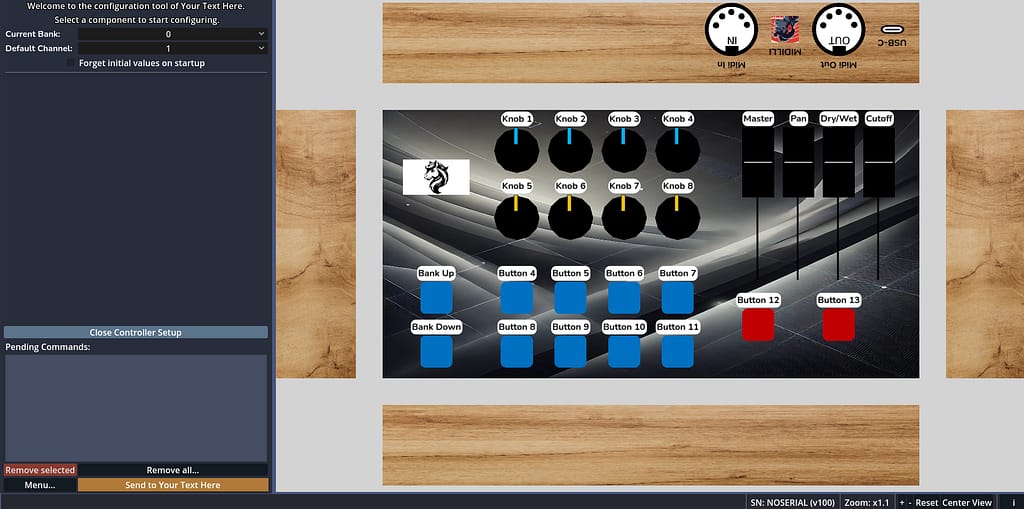
Similar to the MIDILLI Factory, you can left-click components to select them, hold right-click and drag to navigate, and use the mouse wheel to zoom in and out. If you get lost, press Ctrl + H (Windows) or Cmd + H (macOS) to center your view. Pressing Keypad 0 resets the zoom to its default value.
On the bottom right are the status buttons/fields:

SN stands for “Serial Number” and will be updated once you load your configuration. The value inside brackets shows the firmware version. You can click the serial number field to copy it if you need to contact us regarding this device.
Zoom value shows the current zoom factor. You can use your mouse wheel to change zoom, or use the + and – buttons to change it. Reset button resets the zoom to its original value. Alternatively, you can use Keypad 0.
Center View button is handy if you cannot find your way around and need to reset the view to focus on your controller layout. Alternatively, use Ctrl + H (Windows) or Cmd + H (macOS) shortcuts to achieve the same result.
i button on the bottom right toggles the Info Window. If there are messages, it will turn orange, displaying the number of messages within brackets.
First Launch
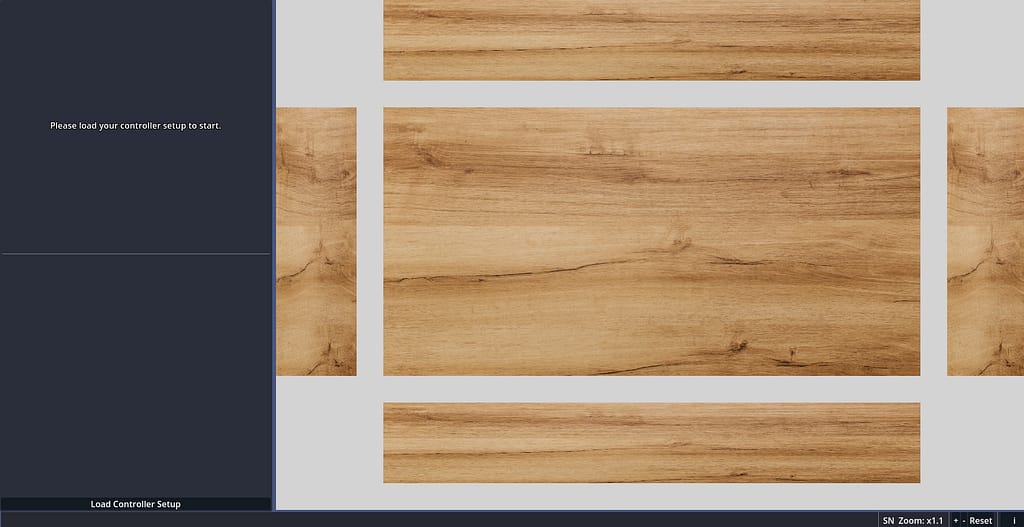
Upon first startup, a blank setup will be displayed. You’ll need to load your own setup to begin. An active Internet connection is also required for the initial setup.
Connect your device via its USB-C interface an press “Load Device Setup” to start. This will fetch your devices registered to your MIDILLI account. You can also use Ctrl + O (on Windows) or Cmd + O (on macOS) (O for Open).
If you are not logged in, you will need to log in with your MIDILLI Account credentials. You have already created an account on MIDILLI during submission of your device.
After logging in, your registered devices will be synchronized. If you have a device that has been produced but not activated, you must first activate it in your MIDILLI Account > My Devices. You will need the device’s serial number. See the relevant section for instructions on how to do this: Device Registration/Activation – My MIDILLI Account.

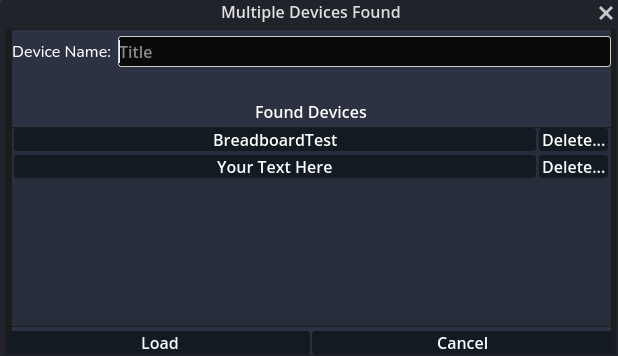
If you don’t have any devices currently set up, you won’t be able to load any configurations. If multiple devices are found in your account, you will be prompted to choose which setup you’d like to load for this session:
Note: If you are trying to load a device that was transferred to you from another person, you will need to complete the transfer process. Please refer to Register Another Device for instructions. If you don’t own a MIDILLI account, please enter your email and a password, then use Create Account button on the login window to create one.
By default, loading a device setup will trigger an update check for both the Configurator and the device’s firmware. You can perform the update if prompted, or ignore them for now. For details on updating, see the Updating Configurator and Updating Firmware sections.
Note: The Configurator communicates with your device using MIDI protocol. This requires that your device is not being used by another application. If so, you will get a warning. Close the application using your MIDI controller and try again.
Configuring Components
Components is the general term for all available units on your device, including interfaces, inputs, outputs, screens, potentiometers, and more. Control elements is a more specific term, referring only to potentiometers, buttons, and faders—elements that either control other devices or are controlled by you through interaction.
This section provides general instructions. For the most accurate guidance, refer to your specific Configurator manual, as available components may vary by device.
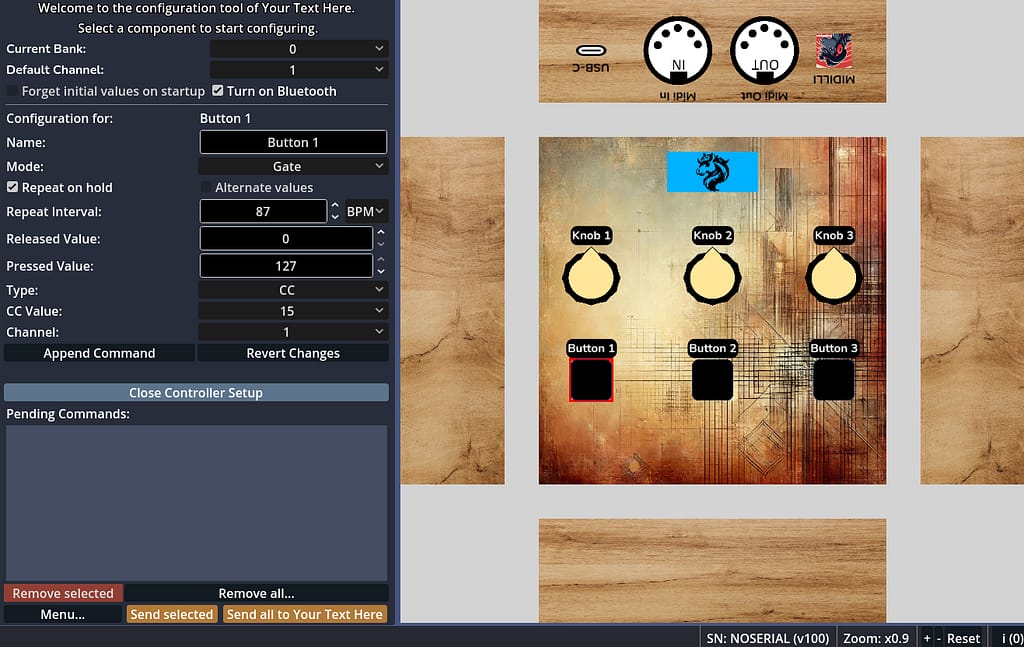
To configure a component of control element, left-click to select. Depending on the type, the left area will list the available configuration options. Below, a Knob is selected:
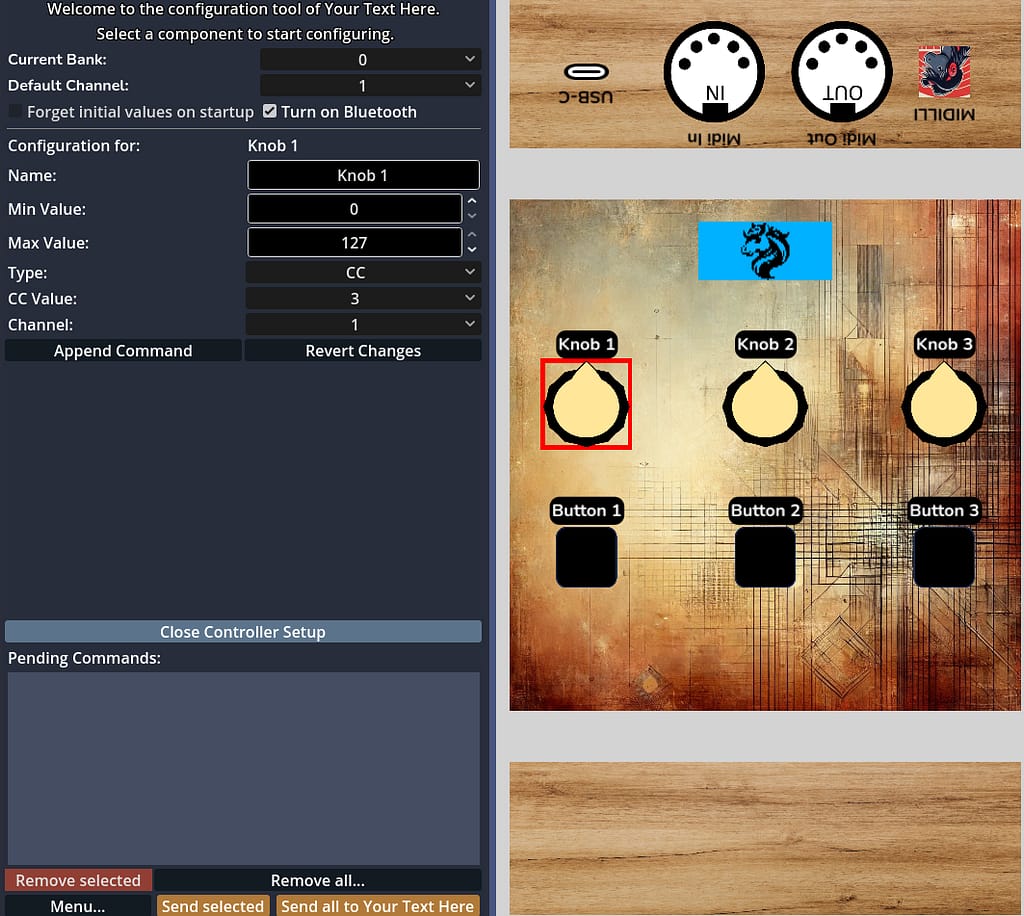
The configuration of a control element applies to the current bank. Therefore, any changes made to the settings of a control element will only affect its configuration within this specific bank.
Once you change the configuration of a control element, the change will not be applied immediately. To confirm the change, click “Append Command” to add it to the list of pending commands. Then, to execute the pending commands, click the “Send all to [CONTROLLER NAME HERE]” button. Alternatively, you can also mark which commands to send, then choose “Send selected”. Context menu on the pending commands, which can be opened with right-click will show you some options for changing your selections.
Global Configuration
Global configuration options apply to the whole controller.

Currently there are up to four (4) options:
Current Bank
MIDILLI Controllers eliminate the limitation on control elements by allowing you to switch between banks. This way, you’re not restricted by the number of control elements.
By default, all MIDILLI controllers can control up to 94 control elements using banks. To determine how many banks you can have, divide this number by the number of control elements on your controller. By changing this option, you can switch to a different bank, which will update the messages sent by the control elements as well as other configuration values. Below, banks are explained in Changing Bank section.
Banks can also be used to perform automation. See Automation section for more.
Changing this value will immediately update the configuration of the control elements. If different names are assigned to different banks (explained below), those will be updated as well.
Default Channel
The Default MIDI Channel determines which MIDI channel the device uses to send or receive data. The MIDI protocol offers a total of 16 channels, allowing different devices or control elements to operate simultaneously. By default, all control elements use this channel, and on first startup, all control elements are set to channel 1. However, in the configuration, each control element can be assigned a different channel.
If you haven’t made any changes to the configuration, you can modify the default channel here, which will apply to control elements that still have their factory default settings.
Here is an overview of typical channel assignments:
- Channel 1: Often used for general control or as the main channel.
- Channels 2-10: Commonly used for sound and instrument control.
- Channels 11-16: These are often used for more specialized control or can be reserved for different devices or customized functions.
Once you change the default channel value, it will be appended to the list of pending commands. To execute pending commands, click “Send to [CONTROLLER NAME HERE]” button.
Note that, if you changed any control elements to use a different setting, the default channel will not change their existing channel.
Forget initial values on startup
By default, the MIDILLI controllers synchronize with the connected device by sending the last known values of all knobs and faders at startup. This ensures that your setup remains as you left it, without disrupting configurations in your DAW or connected hardware.
However, if you enable this option, a.k.a. Amnesia Mode, MIDILLI will not send knob and fader values at startup. Instead, the first value is transmitted only when you physically adjust a control element.
Turn on Bluetooth
If you have Bluetooth interface on your controller, you can check the box to turn it on, uncheck to turn it off. The change will apply immediately.
Control Elements
Control elements are components that are directly controlled by you and send a MIDI message to control another device or function. Knobs, Faders, and Buttons are control elements.
After selecting a control element, it will be highlighted with a red rectangle, and its current configuration for the current bank will be displayed on the left.
Their common configurable options are:
Name:
The visible name for this control element on the current bank and, if applicable, on the controller’s display. You can assign a name like “Metronome”, “Cutoff”, or “Master Volume” to make it easier to remember, especially if you use the element for the same function regularly. You can enter up to 12 characters and only use Latin letters, numbers, and punctuations. The name will be shown if the Type is Control Change (CC) or Note.
Otherwise, the PC, RPN, or NRPN values will be shown instead.
If you set a button to send a Clock, no text will be displayed on the screen.
Type:
The type of MIDI message that will be sent. The available options are Control Change (CC), Note, Bank*, Program Change (PC), Registered Parameter Number (RPN), and Non-Registered Parameter Number (NRPN). For buttons, also Clock will be available.
* The type Bank is not sent outside of the controller.
Type Value:
The specific value sent when the control element’s value changes. For CC, this refers to the CC number; for Note, it’s the Note value; for Bank, it indicates the direction of the bank, or a specified bank. See the Changing Bank section for more on banks.


If you choose PC, it is the program number to be sent together with a bank option as MSB (most significant bit) (CC 0) and LSB (least significant bit) (CC 32). The implementation on the MIDI device receiving this message varies from manufacturer to manufacturer, hence it is recommended to check the documentation of the MIDI device.
If you choose RPN or NRPN, instead of a dropdown menu, a field will let you specify the parameter number which can be between 0 and 16383. MSB and LSB conversions from this decimal value are automatically made.


If you need a conversion between MSB/LSB and the decimal value, you can use the MSB/LSB Value Converter in the Configurator, or our online converter: MSB/LSB Value Conversion Tool.
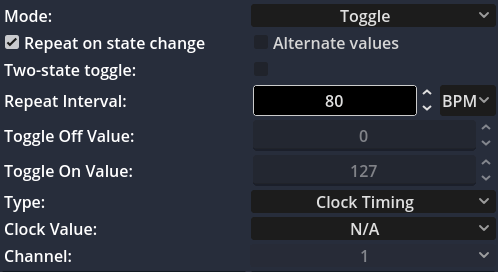
If you select a button, Clock will also appear under Type. Selecting Clock does not require a value and will display N/A. To continuously send the clock message, enable Repeat mode. Check the Mode section below to see how it affects sending. If Repeat mode is disabled, the clock signal will only be sent once like other types. Alternate values, Two-state toggle (on Toggle mode) or Channel also has no effect on the Clock type. An example setup can be seen below:
Channel:
The MIDI channel used when sending the current value of the control element (between the Min and Max, or Released and Pressed values). If no changes have been made to the control element’s configuration, this value will default to the Global Configuration’s Default Channel.
Depending on the type of the control element, there will be additional options available.
Knobs and Faders
Knobs are faders have similar options, their only difference is how they change their values physically. Knobs rotate, faders slide.

In addition to the common configurable values, the following options will also be shown for a knob or fader:
Min Value:
The minimum value this knob or fader will send when set to its lowest position. For a knob, this is when it’s turned all the way to the left (counterclockwise); for a fader, it depends on the orientation, but it’s typically the lowest value. If this value is reached when the type is Note, then Note Off is sent.
In CC or Note messages, the value can range from 0 to 127.
In PC, RPN, and NRPN messages, the value can range from 0 to 16383.
In PC, this is the minimum bank value set via CC 0 (MSB) and CC 32 (LSB). Refer to the MIDI device manual for implementation details.
In RPN and NRPN, this is the minimum parameter value that can be set for the selected parameter. For RPN, CC 101 (MSB), CC 100 (LSB) and for NRPN, CC 99 (MSB), CC 98 (LSB).
Max Value:
The maximum value this knob or fader will send when set to its highest position. For a knob, this is when it’s turned all the way to the right (clockwise); for a fader, it’s the highest value, based on its orientation.
In CC or Note messages, the value can range from 0 to 127.
In PC, RPN, and NRPN messages, the value can range from 0 to 16383.
In PC, this is the minimum bank value set via CC 0 (MSB) and CC 32 (LSB). Refer to the MIDI device manual for implementation details.
In RPN and NRPN, this is the minimum parameter value that can be set for the selected parameter. For RPN, CC 101 (MSB), CC 100 (LSB) and for NRPN, CC 99 (MSB), CC 98 (LSB).
Min and Max Values are considered if the type of the element is CC, Note, PC, RPN, or NRPN. However, for Bank type on Knobs or Faders, reducing the value will select the previous bank (Bank Down), and increasing will select the next bank (Bank Up). Any value set under Bank Value will be ignored.
If you need a conversion between MSB/LSB and the decimal value, you can use the MSB/LSB Value Converter in the Configurator, or our online converter: MSB/LSB Value Conversion Tool.
Adjust the options and press Append Command button to prepare the changes to send to your controller. Before sending them, you can also press Revert Changes to restore original values.
Buttons
MIDILLI controllers have buttons that operate in two physical states: Pressed and Released. The way these states are sent depends on the selected Button Mode.
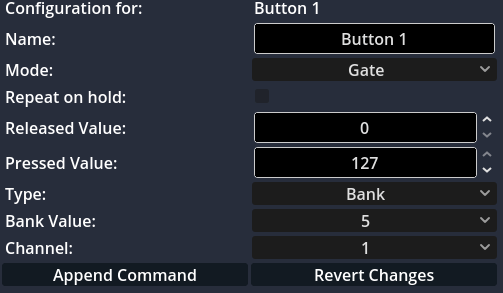
Modes:
You can choose between Gate, Toggle, and Trigger modes.
- Gate: Pressing sends the Pressed Value and releasing sends the Released Value.
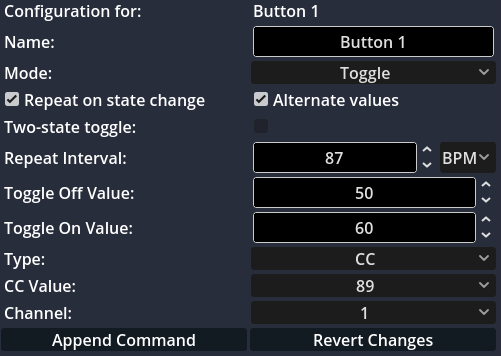
- Toggle: First press sends the Toggle On Value and second press sends the Toggle Off Value.
- Trigger: Pressing sends the Pressed Value, but releasing does not send any values.
Hint: If the button type is set to Clock, releasing in Gate mode or toggling off the button will not resend the clock signal to avoid disrupting time synchronization.
Refer to Min Value and Max Value descriptions above for the details on what is being sent.
Repeat on hold/Repeat on state change:
By default, regardless of the selected mode, button values are sent only once when the button’s state changes. However, if you enable the Repeat option:
- In Gate or Trigger Mode, the Pressed Value will be sent repeatedly until you release the button.
- In Toggle Mode, the Toggle On Value will be sent repeatedly as long as you toggle the button again.
If the Type is set to Bank, the repeat setting will also apply to bank changes. This is useful when automating bank switches or advanced automation (See Automation for more details.).
Alternate values:
By default, Gate, Toggle and Trigger modes only send their Pressed or Toggled On values. If you want to send both Released (for Gate and Trigger) and Toggled Off (for Toggle) values even when the state has not changed, you can enable this mode. The alternating value will be sent after each Delay in ms interval. This is useful e.g., to quickly change a Note, CC, PC, RPN, or NRPN back to its original value after a short delay. This option has no effect if Two-state toggle is enabled, or if Bank mode is selected.
Two-state toggle:
By default, Toggle mode only sends when it is toggled on. If Repeat on state change enabled, you can enable the Two-State toggle option to send both Toggle On and Toggle Off values when the state of toggled on and toggled off.
Repeat Interval:
The repeat interval defines the delay between repeated MIDI signals. You can set a value between 0 and 16,000 in milliseconds (ms) or beats per minute (BPM). This setting allows for precise timing control over repeated messages. The delay timer operates independently for each control element and across different banks.
To send a Clock signal continuously, you need to adjust this parameter.
⚠ Important: Setting the delay to 0 ms allows for continuous message transmission, but if multiple elements are sending repeated values simultaneously, it may exceed the MIDI bandwidth limit. This also applies to a high BPM value.
If you are not receiving the message at the expected timing, you may want to refer to Perfect Timing Considerations.
Adjust the options and press Append Command button to prepare the changes to send to your controller. Before sending them, you can also press Revert Changes to restore original values.
Screens
Screens display your logo at startup, along with the name of your controller, its serial number, and the firmware version. They also show the current bank next to the controller name, real-time changes made on the controller, and the latest sent value of each control element.
The name of the control element will be shown whenever its value changes if the Type is set to Control Change (CC) or Note along with the current value.
For other types (PC, RPN, or NRPN), the corresponding values will be displayed instead, without control element’s name.
If a button is set to send a Clock signal, no text will be shown on the screen.
If your controller has a screen, you can select it to see its configurable options:

Changes on the options will add the new values to the pending commands list. To apply the pending commands, you need to send the command to your controller using the Send to [CONTROLLER NAME HERE] button.
Font Size:
Specifies the font size. Currently, you can choose between Small and Big font sizes. After selecting a new size, the change will be added to the pending command list.
Startup Delay (sec):
By default, during startup, your logo and your controller name will be displayed for 1 second before the controller begins sending values. You can set this delay between 0 seconds (no display) and 10 seconds.
If your controller name and your logo fit in a single scene, they will be displayed together.
If your logo is too large and occupies the entire screen, the startup delay will be split into two:
- The first half will display (your) logo.
- The second half will display (your) controller name.
After selecting a delay, the change will be added to the pending command list.
Note: If you do not have a custom logo or custom controller name, this option will not be visible on the screen.
Interfaces, Inputs, and Outputs
Configuration of the USB-C interface, MIDI Input, and MIDI Output interfaces falls under this category.
Interfaces
Currently, USB-C interface and Bluetooth interface are available. Selecting the USB-C interface will display the output options for both interfaces (if Bluetooth is also available):
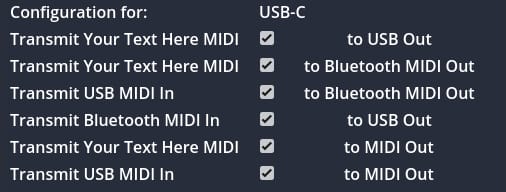
By default, all outputs will be enabled. However, you can choose whether to:
- Transmit MIDI messages generated by your controller to the connected device via the USB interface (e.g., your computer or mobile device).
- Transmit MIDI messages generated by your controller to the Bluetooth MIDI Out. If no Bluetooth interface is available, this option will not be visible.
- Transmit MIDI messages received via USB MIDI In to the Bluetooth MIDI Out. If no Bluetooth interface is available, this option will not be visible.
- Transmit Bluetooth MIDI In to USB Out. If no Bluetooth interface is available, this option will not be visible.
- Transmit MIDI messages generated by your controller to the MIDI Out ports. If no MIDI Output is available, this option will not be visible. If multiple MIDI Outputs are present, this setting will toggle all of them simultaneously.
- Transmit MIDI messages received via USB MIDI In to the MIDI Out. If you do not have any MIDI Outputs, this option will not be visible.
Changing a value will immediately take effect.
MIDI In
If your controller has a MIDI Input, it will have the following options in the Configurator:
By default, all options will be enabled. However, you can choose whether to:
- Transmit MIDI messages generated by your controller to the MIDI Out.
- Transmit MIDI messages received via USB In to MIDI Out (e.g., from your computer or mobile device).
- Transmit MIDI messages received via Bluetooth MIDI In to MIDI Out. This option will not be available if you do not have Bluetooth interface.
- Transmit MIDI messages received via MIDI In to MIDI Out. If no MIDI Output is available, this option will not be visible. If multiple MIDI Outputs are present, this setting will toggle all of them simultaneously.
Changing a value will take effect immediately.
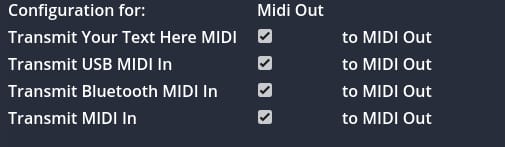
MIDI Out
If your controller has at least one MIDI Output, it will have the following options in the Configurator:
By default, all options will be enabled. However, you can choose whether to:
- Transmit MIDI messages generated by your controller to the MIDI Out.
- Transmit MIDI messages received via USB to MIDI Out.
- Transmit MIDI messages received via Bluetooth to MIDI Out.
- Transmit MIDI messages received via MIDI In to MIDI Out. If no MIDI Input is available, this option will not be visible. If multiple MIDI Outputs are present, this setting will toggle all of them simultaneously.
Changing a value will take effect immediately.
If you’d like to see all routing settings on all available interfaces, you may consider checking MIDI Routing Matrix.
Other Components
Your controller may also have the following components:
MIDILLI Button
It is mandatory to have this button. Details are explained in the Factory manual (search for MIDILLI Button) as well as in the Controller manual. This button offers no customization, but it may change in the future.
MIDI Thru
Your controller may also include a MIDI Thru component. This is a physical passthrough that replicates incoming MIDI In messages as output. This component offers no customization.
Applying the Changes
Most changes to control element configuration are not applied immediately. You need to confirm them first.
After adjusting any desired value on a control element, click “Append Command” under the configuration values to confirm your new settings. If you wish to revert to the previous values before appending, click “Revert Changes” to restore the settings from your controller.
Appended commands will appear in the “Pending Commands” list.
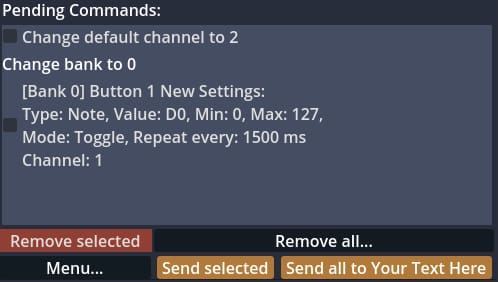
To send all pending commands, click Send to [CONTROLLER NAME HERE].
Alternatively, you can select the commands you would like to send to your controller by checking the boxes to the left of them.
You can use the context menu to select all items at once, deselect all, or invert the selection. Open the context menu by right-clicking on the pending commands list.
If a command does not have a checkbox next to it, it means it is dependent on the command below. Removing a command with a checkbox will also remove all commands that depend on it.
To send only the selected commands, click Send selected.
The sent commands will be removed from the pending command list.
To remove specific pending commands, select the items you wish to delete and click Remove selected. You can also use Remove all… to clear the entire pending command list after confirming the removal.
Menu Button
Menu button offers a set of functions which are relevant to your device or your MIDILLI account:
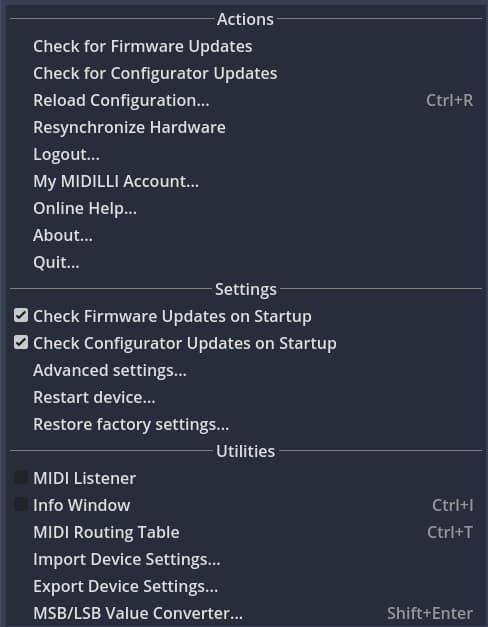
Information: If a menu item contains three dots (…), it will not be executed immediately but will require your confirmation first, or another dialog/window will be shown.
If an action has a shortcut assigned to it, they will be shown on the right side.
Actions:
- Check for Firmware Updates: Perform a one-time check for available firmware updates. If an update is found, you will be guided through the steps to complete the update.
- Check for Configurator Updates: Perform a one-time check for available Configurator updates. If an update is found, you will be guided through the steps to complete the update.
- Reload Configuration…: Reloads the current configuration from the controller, including both global settings and the control element configuration for the active bank.
- Resynchronize Hardware: Fetches new hardware if you accidentally remove them, or if instructed to do so.
- Login/Logout…: Depending on your online status, Login will ask your credentials to login to your MIDILLI Account, and Logout will log you off.
- My MIDILLI Account…: Opens the MIDILLI Account page with your currently logged in credentials.
- Online Help…: Opens this help.
- About…: Opens the About window where you can see the version info and your online status.
- Quit…: Prompts for confirmation before closing the Configurator and exits.
Settings:
- Check Firmware Updates on Startup: Toggles automatic firmware update checks after loading a setup (enabled by default).
- Check Configurator Updates on Startup: Toggles automatic firmware update checks after loading a setup (enabled by default).
- Advanced settings…: Opens a window with available advanced settings for advanced users, or diagnostic purposes.
- Restart controller…: Closes the current setup and restarts the controller after 1 second.
- Restore factory settings…: Something not working as expected? Unsure how to fix a complex setup? This will restore your settings to their original state. We’ve saved them on your device just in case you ever need them.
Utilities:
- MIDI Listener: Toggles MIDI Listener window.
- Info Window: Toggles Info Window.
- MIDI Routing Table: Opens MIDI Routing Matrix.
- Import Device Settings…: Imports your device settings from a file.
- Export Device Settings…: Exports your device settings to a file.
- MSB/LSB Value Converter…: Opens the converter window to convert MSB and LSB values to decimal and vice versa.
Utilities
The Configurator provides two utilities which you may find helpful during configuration:
MIDI Listener: A MIDI monitor window to display received messages from your controller. Read more: MIDI Listener
Info Window: A window which keeps all recently shown messages. Read more: Info Window
MIDI Routing Table: Lets you change how the MIDI messages should flow. Read more: MIDI Routing Matrix
Import Device Settings…: Select a previously exported settings file to reload your configuration. See Importing/Exporting Device Settings for more details.
Export Device Settings…: Choose which device settings to export. See Importing/Exporting Device Settings for more details.
MIDI Listener
Opening the MIDI Listener will display a draggable window where you can see the incoming MIDI messages received from your controller.
The results of the last configuration changes will also be displayed here.

Each received message will display the time they were received, the type of MIDI message, the channel, the message type’s value, and the current value. The newest message will be shown on the top.
You can toggle it using Menu… > MIDI Listener.
Info Window
The Info Window displays important information that requires your attention.
Once a short message is shown and dismissed, it will be stored in the Info Window. You can toggle it using Ctrl + I (on Windows) or Cmd + I (on macOS). Alternatively, you can access it via Menu… > Info Window or by clicking the i button in the bottom-right in the status bar.
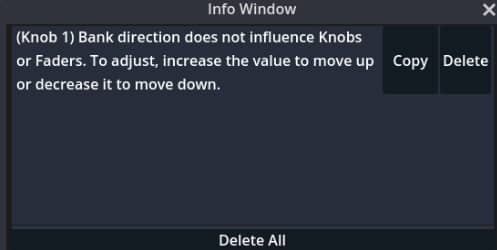
The newest message will be shown on the top.
MIDI Routing Matrix
MIDILLI Controllers can also function as a MIDI Hub, allowing any interface to receive and transmit MIDI messages. By default, all incoming MIDI messages from available interfaces and inputs are forwarded to all available outputs and interfaces. Additionally, all MIDI messages generated by your controller are sent to all outputs.
If you want to customize this behavior, you can select specific inputs, outputs, or the USB-C interface on your design in the Configurator on the setup. Alternatively, you can use the MIDI Routing Matrix to control which incoming MIDI messages are forwarded to specific outputs, as well as how your controller’s own MIDI messages are routed.
Open the MIDI Routing Matrix via Menu … > MIDI Routing Table. You can alternatively use Ctrl + T (on Windows) and Cmd + T (on macOS).
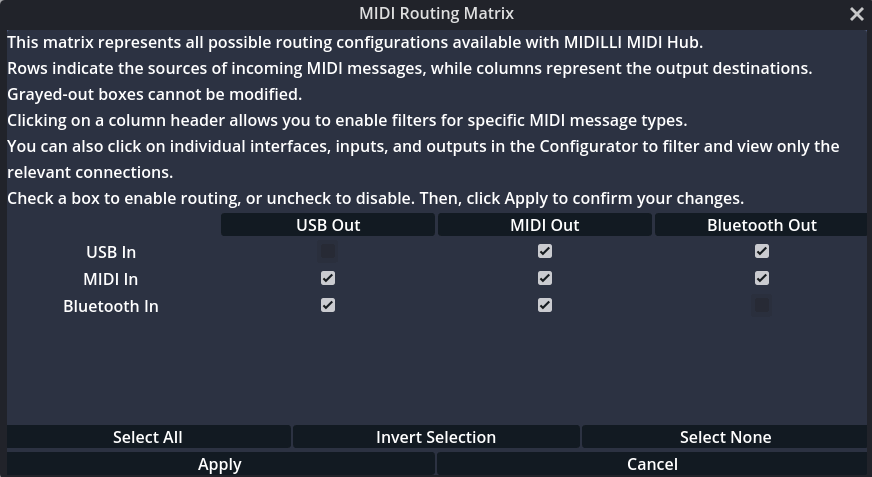
Simply check the options you want to enable and uncheck the ones you want to disable.
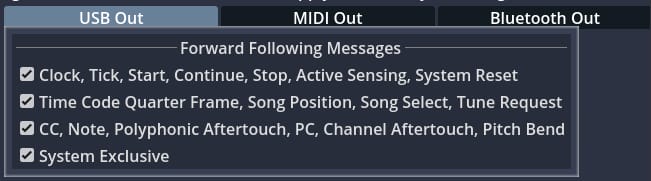
Clicking on the column headers will open additional filtering options. You can select which types of MIDI messages should be forwarded to specific outputs. Similarly, select or deselect options as needed, and click anywhere else to close the popup:
After clicking Apply will update your controller with the new settings. The grayed out boxes cannot be enabled or disabled.
Importing/Exporting Device Settings
You can save your device’s configuration to a file for future use or import a previously saved configuration to restore your settings. This is useful for creating backups or switching between different setups for live performances or studio sessions.
Export Settings
You can open the Export Settings window by clicking on Menu … > Export Device Settings…
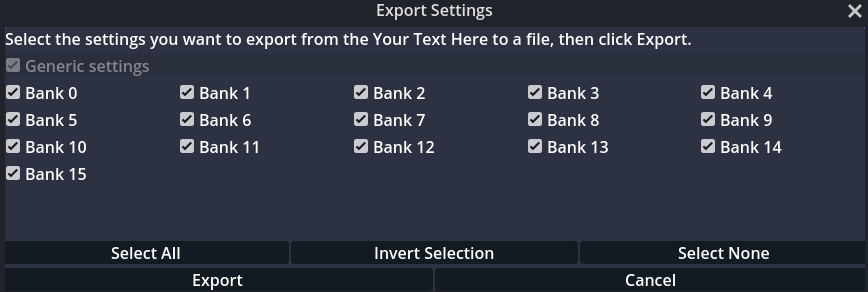
The exported file will include:
- Generic settings (always included):
- Current MIDI routing configuration
- Whether values are sent on startup (Forget initial values on startup value)
- Screen font size (if applicable)
- Additional startup delay (if applicable)
- Bluetooth on/off state (if available)
- Bank settings:
- Names and current configurations of all control elements in the selected banks. By default, all banks will be selected.
To export, select the banks you want to export its settings and click “Export.” Choose a file name and location.
Note: Exporting may take some time depending on the number of selected banks. You can cancel the process if needed.
Import Settings
To restore a previously exported settings for the current device, use Menu … > Import Device Settings… and select the file you would like to import. The MIDILLI Settings file will have the “.mdl” extension.
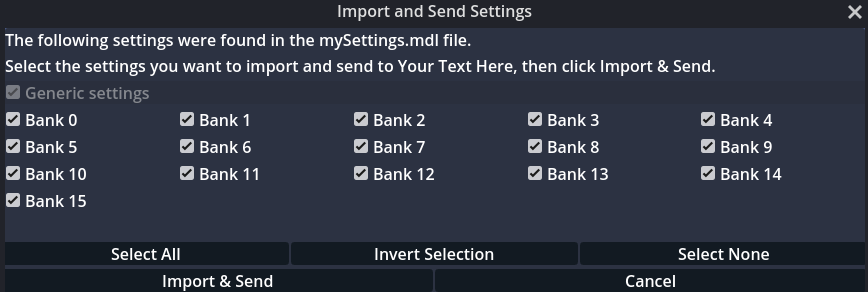
Once you select a file from your computer, the window will display the settings found in the selected file. Choose the settings you want to import, then click “Import & Send” to apply them to the currently loaded device. Generic settings are mandatory and ensure that the settings are valid for your current device.
Note: Importing may take some time depending on the number of selected banks. You can cancel the process if needed.
Note: Settings are specific to the currently loaded device, and cannot (and shall not) be used for other devices. If this is the case, you will get an error.
MSB / LSB Value Converter
MIDILLI controllers use decimal values, combining MSB (Most Significant Byte) and LSB (Least Significant Byte) where 14-bit messages can be utilized. Examples of these fields include PC, RPN, and NRPN. For PC, this refers to bank selection, while for RPN and NRPN, it relates to parameters and their values in decimal.
However, due to the limitations of MIDI 1.0, these values cannot be transmitted as a whole and must be split into MSB and LSB. Some MIDI devices may provide MSB and LSB values in their user manuals instead of the complete value. In such cases, you may need to convert them. You can use our online conversion tool or the MSB/LSB Value Converter available in the configurator. Open it using Shift + Enter or navigate to Menu … > MSB/LSB Value Converter.
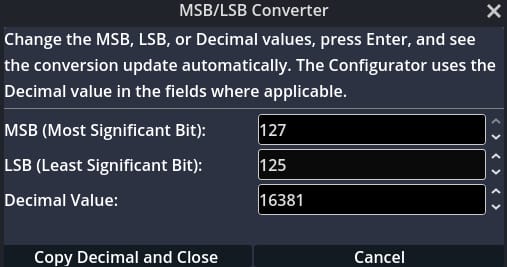
The conversion works both ways: you can enter the MSB and LSB values and see the result in decimal, or input the decimal value and get the corresponding MSB/LSB. After entering the values, press Enter to see the conversion. Selecting “Copy Decimal and Close” will copy the decimal value to your clipboard and close the window.
The formulas for conversion can also be found online: MSB/LSB Value Conversion Tool
Updating Firmware
From time to time, you may receive new firmware which will bring even more great features, or improve the usability. In that case, you will need to update your controller with the latest firmware made available to you. By default, after each load of your setup, it will automatically be checked. If disabled, you can also perform a one-time check via Menu… > Check for Firmware Updates.
Note that you need to be ONLINE for this operation. You can check your online status via Menu… > About… window.
If a new firmware update is found, you will see one of the following confirmation dialogs, depending on whether the firmware is already available on your computer:
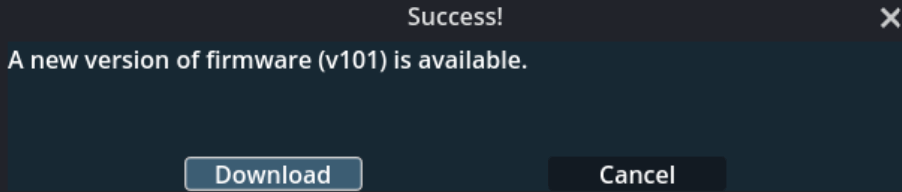
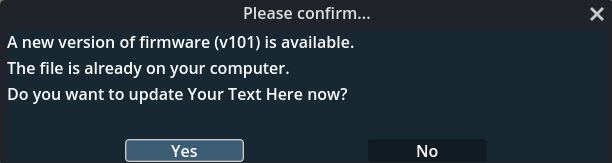
This dialog will guide you through the update process. Clicking on Download will automatically download the suitable firmware for your controller and proceed with update:

⚠ Important: Keep the controller connected during the update to prevent hardware damage, which could result in a permanently bricked device—irrecoverable even by us. Also, ensure that only one MIDILLI Controller is connected to your computer.
Clicking Continue will start the update. However, you may need to download the ESP Tool once before performing the update. You will be asked if this is the case:
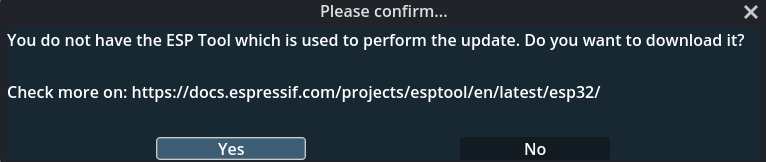
This tool is provided by Espressif, the manufacturer of the microcontroller used in MIDILLI Controllers. So, it is safe to continue download.
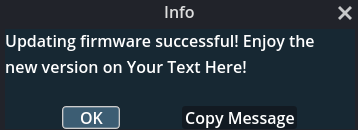
After downloading the ESP Tool, your controller will restart after 1 second, and the update will begin. At this stage, you cannot cancel the update or close the Configurator, as doing so may permanently damage your hardware:

Updating Configurator
Similar to firmware update, the Configurator will also receive regular updates with new exciting features and improvements. In that case, you will need to update your Configurator with the latest software version. By default, after each load of your setup, it will automatically checked. If disabled, you can also perform a one-time check via Menu… > Check for Configurator Updates.
If a new version is found, you will be redirected to the download page. Simply download the latest version for your operating system and start using it!
Changing Bank
MIDILLI controllers allow you to control more functions than the number of physical control elements available. By default, regardless of how many control elements your controller has, you can manage up to 94 functions using banks. Each controller comes with preassigned functions, where all control elements are mapped to CC numbers and configured to send CC messages. Below is the list of CC numbers assigned to your controller based on its ID.
  3   9  14  15  18  19  20  21  22  23
 24  25  26  27  28  29  30  31  36  37
 38  39  40  41  42  43  44  45  46  47
 48  49  50  51  52  53  54  55  56  57
 58  59  60  61  62  63  72  73  74  75
 76  77  78  79  82  83  86  87  89  90
 91  92  93  94  95  97  98  99 100 101
102 103 104 105 106 107 108 109 110 111
112 113 114 115 116 117 118 119 122 123
124 125 126 127
Each line contains 10 CC numbers. For simplicity, assume you have 10 control elements. When you switch to bank two, the CC numbers from the second line (ranging from 24 to 37) will be assigned to your controls.
If you’re satisfied with the default control element assignments, you can switch banks using the Configurator. Alternatively, you can change a control element’s type to “Bank” and assign it a value (previous, next, or a specific bank). This allows you to switch banks directly using the control element, without needing the Configurator.
To do this, select a control element and set its type to “Bank.” Then, choose the value in which you want to switch banks:
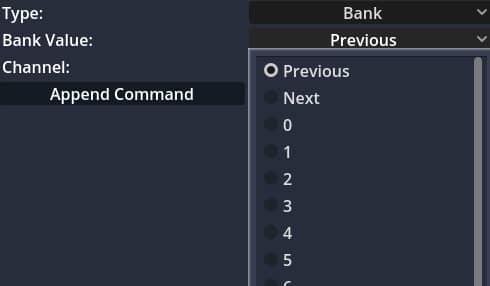
“Previous” selects the previous bank, while “Next” selects the next bank. Selecting another number from the list will jump to that bank when button state is changed.
If you have a screen on the controller, current bank will also be shown next to the controller name on the top.
Note: If you use the “Bank” option on knobs or faders, the bank value setting has no effect. Lowering its value switches to the previous bank, while increasing it switches to the next bank.
Automation
Now, let’s talk about automation. We’ve mentioned it before.
The MIDILLI Controller offers you a simple yet powerful automation system. Automation can be used with all buttons. You can automate various functions using button modes, toggle states, repeat modes, and bank switching features.
Automation applies only to the active bank. If you switch banks, the button configurations of the newly selected bank will take effect.
Basic Automation
The simplest automation is enabling Repeat on Hold while the button mode is set to Gate. Then, set a Delay in ms between 0 and 16000 (16 seconds). When you hold down the button, the same CC message, Note, PC, RPN, NRPN values or Clock will be sent repeatedly. When you release the button, message transmission stops, and the Released Value will be sent once.
Toggle-Based Automation
Another automation method involves using the Toggle button mode. Enable Repeat on state change and enter a delay in milliseconds. When the button is toggled on, it will send the Toggle On Value at the specified delay interval. This can be used for sending CC, Note, PC, RPN, NRPN values, or Clock continuously. When the toggle state changes to off, the Toggle Off Value will be sent once, and the repeating action will stop.
If desired, you can enable the Two-State Toggle option in Toggle mode. This ensures that the Toggle On Value is sent when the button is active, and the Toggle Off Value is sent when it is inactive. In this case, repeat functionality will work for both states.
Even when switching banks, a button set to Toggle On will remember its state. When you return to the original bank, if the button was on, it will resend the Toggle On Value. This can be useful for more advanced automation setups.
Considerations When Using Repeat Mode
If you use repeat mode on multiple buttons, ensure that the Delay in ms is configured properly so it does not exceed MIDI bandwidth limits. Otherwise, some messages may be delayed or might not be received at all. You will get a warning if this may be the case.
Bank Switching Automation
The final automation feature allows buttons to be configured to change banks instead of sending MIDI messages.
- If the button mode is Gate, the bank will switch only when pressed.
- If the button mode is Toggle, the bank will switch only when toggled on.
- The Two-State Toggle option does not apply to bank switching.
Example: Automating Bank Switching with C4 and D4
Let’s go through a practical automation example with two buttons:
- Set the global configuration “Current Bank” to 0.
- Select first button (Bank Switcher, Bank 0 → Bank 1)
- Set mode to Toggle.
- Enable Repeat on state change.
- Set Delay to 1000 ms.
- Set Type to Bank and Bank Value to 1.
- Click Append Command.
- Select second button (Note Trigger, C4)
- Set mode to Toggle.
- Enable Repeat on state change and Alternate values.
- Set Delay to 500 ms.
- Set Type to Note and select C4.
- Click Append Command.
- Keep Min = 0, Max = 127.
- Switch to Bank 1 in the Global Configuration.
- Select first button again (Bank Switcher, Bank 1 → Bank 0)
- Set mode to Toggle.
- Enable Repeat on State Change.
- Set Delay to 1000 ms.
- Set Type to Bank and Bank Value to 0.
- Click Append Command.
- Select second button again (Note Trigger, D4)
- Set mode to Toggle.
- Enable Repeat on state change and Alternate values.
- Set Delay to 250 ms.
- Set Type to Note and select D4.
- Click Append Command.
- Keep Min = 0, Max = 127.
- Check the pending command list. It should contain 4 commands. Click “Send All”.
- Switch to Bank 0 in the Global Configuration.
- Open the MIDI Listener via Menu …> MIDI Listener if it is not already open.
- Clear all messages in the MIDI Listener by clicking “Delete All”.
Testing the Setup
- Press the second button (C4 trigger) → It should send C4 twice per second (127 → 0).
- Press the first button (Bank Switcher) → It switches to Bank 1 (you can confirm this on the screen if available).
- Press the second button (D4 trigger) → It should now send D4 four times per second (127 → 0 → 127 → 0).
- Press the first button again (Bank Switcher) → It switches back to Bank 0.
Now, the loop continues: 2x C4 → Bank Switch → 4x D4 → Bank Switch → Repeat.
To stop the loop:
- First, press the Bank Switch button (first button) and stop bank switching.
- Then press the Note button (second button) to toggle the button off.
- Repeat step 1 and 2 for the other bank.
Perfect Timing Considerations
For perfect timing, the toggle states must be turned on or off at the same time. Otherwise, your bank may change too early before the Note Off message is sent. This happens because each control element has its own timer. Proper synchronization of button presses is crucial for achieving the desired automation effect.
If you find that the messages are not sent at the correct time, you may need to change the driver latency compensation value which is available in Menu… > Advanced settings….
Advanced Settings
The Advanced Settings window provides fine-tuned control over various MIDI parameters, allowing you to optimize performance for your specific setup. These options include message handling behaviors, timing adjustments, and compatibility settings for different DAWs and MIDI devices. Adjust these parameters only if you encounter unexpected behavior or need precise customization for your workflow.
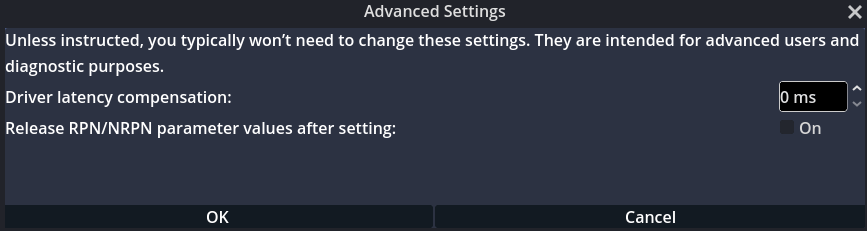
Driver latency compensation: The MIDILLI devices use the default driver available in the operating system for the plug-and-play. However, the operating systems may sometimes introduce a slight delay, causing messages to be received later than expected. To compensate for this delay, you can adjust this value.
For example, if you are receiving a message every 101 ms instead of the expected 100 ms, setting this value to 1 ms will correct the timing. Pressing OK will add the new value to the pending commands.
Release RPN/NRPN parameter values after setting: This reset process is used in some MIDI devices or software to prevent RPN and NRPN messages from remaining active continuously. If the reset is not performed, the same parameter will stay selected until another RPN and NRPN message is sent, which may lead to unintended results on some old devices. Enabling this will send two more messages to release the related CC values by sending 127 as values to:
- CC 100 and 101 on RPN.
- CC 98 and 99 on NRPN
If some devices work fine without RPN/NRPN reset and you want to avoid unnecessary messages, uncheck to disable it. If skipping the reset causes issues in some DAWs or MIDI devices, keep it enabled by checking the box.